
Trickle charger (portable charging cable)(Type A)
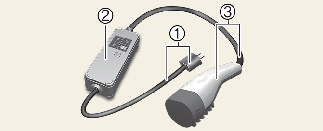
Trickle charger can be used if AC Charger is unavailable.
-
Plug and cable
-
Control box (ICCB)
-
Charging connector/cable
How to connect portable charger (ICCB: In-Cable Control Box)
-
Turn OFF all switches, move the shift lever or dial to P (Park), and turn OFF the vehicle.
-
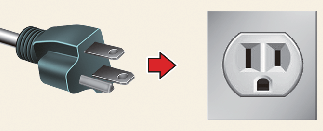
Connect the plug to a household electric outlet.
-
Check if the power lamp (green) illuminates on the control box.

-
Depress the brake pedal and apply the parking brake.
-
Turn OFF all switches, shift to P (Park), and turn OFF the vehicle. If charging is initiated without the gear in P (Park), the charging will start after the gear is automatically shifted to P (Park).
-
Open the charging door.
-
Open the protective caps of the charging connector and the charging plug. Check if there are any foreign substances or dust.
-
Hold the charging connector handle and connect it to the vehicle charging inlet. Push the connector all the way in.
 NOTICE
If the charging connector and charging inlet are not connected properly, the connector may droop or vibrate. In this case, hold the charging connector handle and push it all the way in.
-
Charging starts automatically (charging lamp illuminates).
-
Check if the charging indicator light (
 ) of the high voltage battery in the instrument cluster is turned ON. Charging is not active when the charging indicator light
() is OFF. When the charging connector is not connected properly, reconnect the charging cable to charge it again.
) of the high voltage battery in the instrument cluster is turned ON. Charging is not active when the charging indicator light
() is OFF. When the charging connector is not connected properly, reconnect the charging cable to charge it again.
-
After charging has started, the estimated charging time is displayed on the instrument cluster for about 1 minute.
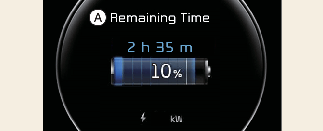
A: Remaining Time
If you open the driver’s door while charging, the estimated charging time is also displayed on the instrument cluster for about 1 minute. When scheduled charging or scheduled air conditioner/heater is set, the estimated charging time is displayed as "--".

If the charging connector and charging terminal are not connected properly, this may cause a fire.
How to Set the Charge Level of the Portable Charger
-
Check the rated current of the electric outlet prior to connecting the plug to the outlet.
-
Connect the plug to a household electric outlet.
-
Check the display window on the control box.
-
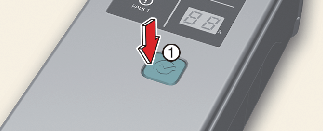
Press the button (1) on the front of the control box for 2 to 8 seconds to adjust the charge level. (Refer to charging cable type and example for setting the ICCB charge level.)
-
The charge level on the display window of the control box changes every time you press the button (1).
-
When setting the charge level is complete, start charging according to the portable charge procedure.
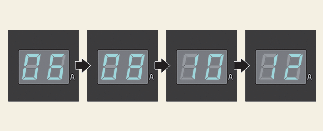
Example for setting the ICCB charge level
The following is merely an example.
|
Outlet current |
ICCB charge level |
|---|---|
|
14~16 A |
12 A |
|
12~13 A |
10 A |
|
10~11 A |
8 A |
|
8~9 A |
6 A |
Please make sure that charge level selection matches the capacity of your circuit breaker to avoid blowing a fuse.
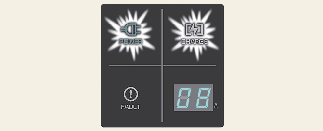
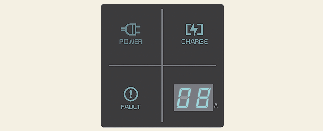
Charging status indicator lamp for portable charger
|
Indicator |
Details |
|
|---|---|---|
|
POWER |
On: Power on |
|
|
CHARGE |
On: Charging Blink: Current limit due to high plug temperature or high internal temperature |
|
|
FAULT |
Blink: Charging interrupted |
|
|
CHARGE LEVEL |
12 |
12 A |
|
10 |
10 A |
|
|
08 |
8 A |
|
|
06 |
6 A |
|
|
The charging current changes whenever the button (1) is pressed for less than 1 sec with the charger plugged into an electrical outlet but not the vehicle. Control box
|
||
Status/Diagnosis/Countermeasure
-
Charging connector plugged into vehicle (POWER Green ON)
-
Plug connected to an electric outlet (POWER Green ON)
While charging
-
Charge indicator (POWER Green ON/CHARGE Blue ON)
-
Charging current
Before plugging charging connector into vehicle (POWER Green ON, FAULT Red blink)

-
Abnormal temperature
-
ICCB (In-Cable Control Box) failure
Plugged into vehicle (POWER Green ON, FAULT Red Blink)
-
Diagnostic device failure
-
Current leakage
-
Abnormal temperature
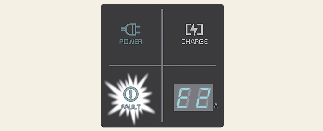
Leakage current failure (POWER Green ON, FAULT Red Blink)
-
Disconnect and reconnect the power plug to clear the error.
Power saving mode
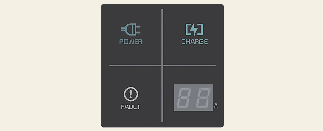
-
Charge level indicator is turned off if there is no status change for more than 1 minute.
How to disconnect portable charging cable (ICCB: In-Cable Control Box)
-
Before disconnecting the charging connector, make sure the doors are unlocked. To prevent charging cable theft, the charging connector cannot be disconnected from the inlet when the doors are locked. However, if the vehicle is in the charging connector AUTO mode, the charging connector automatically unlocks from the inlet when charging is completed.
NOTICEIn order to disconnect the charging connector, unlock the doors to unlatch the charging connector lock system. If not, the charging connector and the vehicle's charging inlet may be damaged.
-
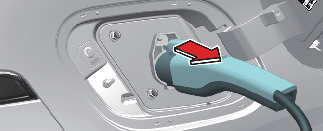
Hold the charging connector handle and pull it out.
-
Make sure to securely close the charging door.
-
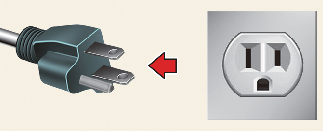
Disconnect the plug from the household electric outlet. Do not pull the cable when disconnecting the plug.
-
Close the protective cover for the charging connector so that foreign material cannot get into the terminal.
-
Put the charging cable inside the cable compartment to protect it.
Precautions for portable charging cable (ICCB: In-Cable Control Box)
-
Use the portable charging cable that is certified by Kia.
-
Do not try to repair, disassemble, or adjust the portable charging cable.
-
Do not use an extension cord or adapter.
-
Stop using immediately if failure warning light occurs.
-
Do not touch the plug and charging connector with wet hands.
-
Do not touch the terminal part of the AC charging connector and the AC charging inlet on the vehicle.
-
Do not connect the charging connector to voltage that does not comply with building codes and regulations.
-
Do not use the portable charging cable if it is worn out, has wires exposed, or there exists any type of damage on the portable charging cable.
-
If the ICCB case and AC charging connector is damaged, cracked, or the wires are exposed in any way, do not use the portable charging cable.
-
Do not let children operate or touch the portable charging cable.
-
Keep the control box free of water.
-
Keep the AC charging connector or plug terminal free of foreign substances.
-
Do not step on the cable or cord. Do not pull the cable or cord and do not twist or bend it.
-
Do not charge when there is a risk of lightning.
-
Do not drop the control box or place a heavy object on the control box.
-
Do not place an object that can generate high temperatures near the charger when charging.
-
Charging with the worn out or damaged household electric outlet can result in a risk of electric shock. If you are in doubt to the household electric outlet condition, have it checked by a licensed electrician.
-
Stop using the portable charging cable immediately if the household electric outlet or any components is overheated or you notice burning smells odors.
Trickle charger (portable charging cable) (Type B)
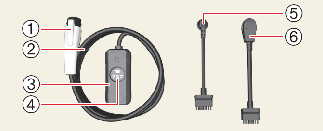
Trickle charger can be used if AC Charger is unavailable.
-
Charging Connector
-
Cable
-
Control Box (ICCB)
-
Display
-
Detachable Connector (5-15P)
-
Detachable Connector (14-50P)
|
Description |
Specifications |
|---|---|
|
Voltage |
120 V / 240 V AC single-phase |
|
Maximum Current |
12A MAX / 30A MAX with different input cord set. |
|
Frequency |
60 Hz |
|
Cable Length |
20 ft(6.1 m) |
|
Weight |
9.0 Ibs(4.1 kg) |
|
Operating Temperature |
-40 °F to +122 °F(-40 °C to +50 °C). |
|
Enclosure Type |
Type 6 (IP67) |
|
Ventilation |
Not Required |
Charging status indicator lamp for portable charger
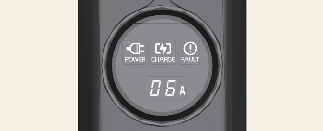
|
Indicator |
Details |
|
|---|---|---|
|
POWER |
 |
On: Power on |
|
CHARGE |
 |
On: Charge Blink: Current limit due to high plug temperature or high Internal temperature |
|
FAULT |
 |
Blink: Charging interrupt |
|
CURRENT |
 |
Display setting current or trouble shoot code |
|
CHARGE LEVEL |
30 |
30 A |
|
24 |
24 A |
|
|
20 |
20 A |
|
|
16 |
16 A |
|
|
12 |
12 A |
|
|
10 |
10 A |
|
|
08 |
8 A |
|
|
06 |
6 A |
|
|
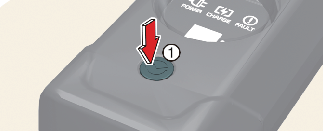
The charging current changes each time the button (1) is pressed, in the following sequence:
Control box
 |
||
How to connect detachable connector
Connect the detachable connector to control box controller socket.
Check the arrow on the top of the connector is no longer visible.
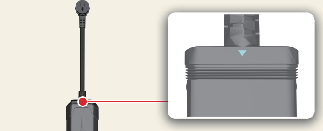
The power lamp (green) illuminates when the ICCB is powered on.
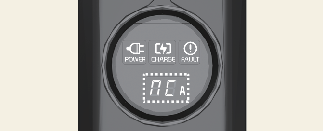
If “NC” is displayed on the ICCB display panel or if the arrow is still visible reconnect the detachable connector properly.
Trouble shooting status indicator lamp
|
Indicator |
Details |
||
|---|---|---|---|
 |
On : Error while charging / Error during self-diagnosis |
||
|
Error code |
item |
cause |
|
|
E1 |
Control pilot communication |
Vehicle communication error |
|
|
E2 |
leakage |
Current leakage |
|
|
E3 |
Charger error |
||
|
E4 |
Plug temperature |
Plug overtemperature warning |
|
|
E5 |
Plug temperature failure |
||
|
E6 |
Charger error |
||
|
E7 |
Overcurrent |
Charging overcurrent warning |
|
|
E8 |
Internal temperature |
Charger overheating |
|
|
E9 |
Charger error |
||
|
F1 |
Relay fusion |
Charger error |
|
|
F2 |
Ground Monitoring / interrupt |
Poor grounding of outlet |
|
|
A5 |
Charger error |
||
|
F3 |
Switched mode power supply power failure |
Switched mode power supply error (voltage failure) |
|
|
F4 |
Switched mode power supply error (abnormal voltage) |
||
|
F5 |
Control Pilot voltage error |
Control Pilot(-) voltage error |
|
|
F6 |
Control Pilot(+) voltage error |
||
|
F7 |
Temperature sensor error |
Plug temperature sensor error |
|
|
F8 |
PCB Internal temperature sensor error |
||
|
F9 |
Detachable plug temperature sensor error |
||
|
A1 |
Detachable plug temperature |
Detachable plug overtemperature warning |
|
|
A2 |
Charger error |
||
|
A3 |
Detachable plug state |
Charger error |
|
|
A4 |
Detachable plug search error |
||
|
FF |
Control box state |
Charger error |
|
How to connect portable charger (ICCB: In-Cable Control Box)
-
Turn OFF all switches, move the shift dial to P (Park), and turn OFF the vehicle.
-
Connect the plug to a household electric outlet.
-
Check if the power lamp (green) illuminates on the control box.

-
Depress the brake pedal and apply the parking brake.
-
Turn OFF all switches, shift to P (Park), and turn OFF the vehicle. If charging is initiated without the gear in P (Park), the charging will start after the gear is automatically shifted to P (Park).
-
Open the charging door.
For more details, refer to More Details.
-
Open the protection caps of the charging connector and the charging plug. Check if there are any foreign substances or dust.
-
Hold the charging connector handle and connect it to the vehicle charging inlet. Push the connector all the way in. If the charging connector and charging terminal are not connected properly, this may cause a fire.
NOTICEIf the charging connector and charging inlet are not connected properly, the connector may droop or vibrate. In this case, hold the charging connector handle and push it all the way in.
-
Charging starts automatically (charging lamp illuminates).

-
Check if the charging indicator light (
) of the high voltage battery in the instrument cluster is turned ON. Charging is not active when the charging indicator light
() is OFF. When the charging connector is not connected properly, reconnect the charging cable to charge it again.
-
After charging has started, the estimated charging time is displayed on the instrument cluster for about 1 minute.
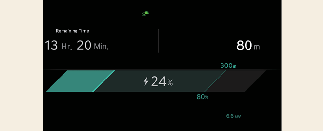
If you open the driver seat door while charging, the estimated charging time is also displayed on the instrument cluster for about 1 minute. When scheduled charging or scheduled air conditioner/heater is set, the estimated charging time is displayed as "--".
Charging cable storage
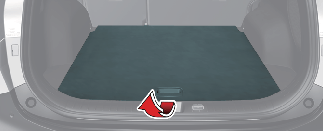
We recommend that the trickle charger cable should be put in the storage box after use.
How to disconnect portable charging cable (ICCB: In-Cable Control Box)
-
Before disconnecting the charging connector, make sure the doors are unlocked. When the door is locked, the charging connector lock system will not allow disconnection. To prevent charging cable theft, the charging connector cannot be disconnected from the inlet when the doors are locked. However, if the vehicle is in the charging connector AUTO mode, the charging connector automatically unlocks from the inlet when charging is completed.
NOTICEIn order to disconnect the charging connector, unlock the doors to unlatch the charging connector lock system. If not, the charging connector and the vehicle's charging inlet may be damaged.
-
Hold the charging connector handle and pull it out.
-
Make sure to securely close the charging door.
-
Disconnect the plug from the household electric outlet. Do not pull the cable when disconnecting the plug.
-
Close the protective cover for the charging connector so that foreign material cannot get into the terminal.
-
Put the charging cable inside the cable compartment to protect it.
Precautions for portable charging cable (ICCB: In-Cable Control Box)
-
If the charger is worn out, exposed, or there exists any type of damage, charging may stop for your safety. Use another charger that works normally.
-
The charger operates from a 240V 30A MAX / 120V 12A MAX with different input cord set.
-
If you use an unauthorized portable charger (ICCB), this may disable charging due to compatibility issues.
-
This product must be grounded
-
For use with Electric Vehicles.
-
Ventilation not Required.
-
This device is intended only for charging vehicles not requiring ventilation during charging.
-
Be sure to use the dedicated plug, and ensure it is fully secured when using a detachable plug.
-
Do not use this with an extension cord.
-
Do not use extension cords, Multi-Outlets, Splitters, Ground Adapters, Surge Protectors, or similar components.
-
When connecting the detachable connector ICCB, connect it in the forward direction.
-
Do not disconnect the detachable connector ICCB while charging.
-
When storing the plug and cable separately, keep it safe from water, liquids, moisture, or snow.
-
Charging with the worn out or damaged household electric outlet can result in a risk of electric shock. If you are in doubt to the household electric outlet condition, have it checked by a licensed electrician.

-
Be careful not to throw or inadvertently impact the internal parts as they may be damaged.
-
Be careful not to drop this device on the ground while charging.
-
Varied with different input cord set.
-
Untie the charging cable before use.
-
If the ICCB case and AC charging connector is damaged, cracked, or the wires are exposed in any way, do not use the portable charging cable.
-
Do not plug in with several electronic products in multiple outlets together.
-
Do not modify or disassemble the provided plug.
-
Do not use the product, if the charging plug is damaged, cracked, broken or otherwise damaged.
-
Using a charging current exceeding the electrical outlet capacity may cause fire or damage to the components. If the outlet capacity is unknown, use the lowest charge level.
-
Disconnect the charging connector from the vehicle first before unplugging it from the wall outlet.
-
Do not connect to another outlet than the rated voltage.
-
Do not disconnect the portable charger from the wall outlet when the vehicle is charging.
-
Do not connect the portable charger into a power outlet that is not properly grounded.
-
Do not touch the terminal part of the AC charging connector and the AC charging inlet on the vehicle.
-
Do not charge when there is lightning.
-
Do not place an object that can generate high temperatures near the charger when charging.
-
Stop using the portable charging cable immediately if the household electric outlet or any components is overheated.
-
Stop using immediately if failure warning light occurs.
-
Do not drop the control box or place a heavy object on the control box.
To prevent property damage or injury due to fire or explosion, follow the instructions below.
-
Risk of electric shock. Do not disconnect under load.
-
The electrical outlet at home must comply with regulations and safely accommodate the voltage, current (amps), and power (patts) ratings specified on the portable charger. If not, the vehicle may not be charged or safety hazards, such as fire, may occur.
-
If the power distributor exceeds its capacity while charging the vehicle with a portable charger at home, the power to home may be cut off or a fire may occur.
-
If you charge the vehicle with household electricity, you are charged electricity bill according to the home rate system, not the electric vehicle rate system.
-
Only use a genuine Kia portable charger. If not, the vehicle may not be charged.
-
Do not let children operate or touch the portable charger. Doing so may lead to unexpected accidents.
-
Immediately stop charging if you discover abnormal conditions, such as odor or smoke.
-
Do not operate the portable charger in temperatures outside its operating range of -40 °F to +122 °F (-40 °C to +50 °C).
-
Store the mobile connector in a clean dry place in temperatures between -40 °F and +185 °F (-40 °C and +85 °C).
-
Do not wrap the charging cable around this device when storing.
-
Risk of electric shock.
-
Do not try to repair, disassemble, or adjust the portable charging cable.
-
A qualified technician should service parts.
-
Do not use this product if there is any damage to the unit.
-
Connect only to properly grounded outlets.
-
Do not touch, connect or pull the plug with wet hands, and keep it free of water, liquid, moisture or snow. It may cause electric shock, serious injury or death.
-
Do not let children operate or touch the plug.
Actions to be taken for electric vehicle charging issues
When you cannot charge the high voltage battery after connecting the charger, check the following:
-
Check the charging settings for the vehicle.
(e.g. when scheduled charging is set, charging is not initiated immediately when the AC charger or portable charger is connected.)
-
Check the operation status of the AC charger, portable charger.
(Status of portable charger)
* Actual method for indicating the charging status may vary in accordance with the charger manufacturer.
-
When the vehicle does not charge and a warning message appears on the instrument cluster, check the corresponding message.
-
If the vehicle is properly charged when charged with another normally working charger, contact the charger manufacturer.
-
If the vehicle does not charge when charged with another normally working charger, have your vehicle inspected by an authorized Kia dealer.