AC charge
You can use an AC charger at home or public charging stations, or the charging cable provided with your vehicle. (if equipped)

-
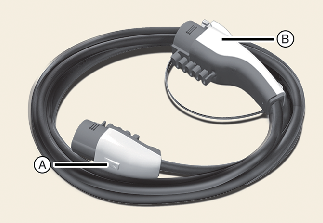
A: Charging plug (Charger)
-
B: Charging connector (Vehicle)
* Shape of charger and how to use the charger may be different for each manufacturer.
How to connect AC charger
-
While the brake pedal is pressed, engage the parking brake.
-
Turn OFF all switches, place the gear in P (Park), and turn OFF the vehicle.
If you try to charge while the gear is not placed in P (Park), it will automatically move to P (Park).
However, charge the battery only when the gear is placed in P for safety reasons.
-
Press the charging door to open the charging door. The charging door opens only when the vehicle's doors are unlocked.

 CAUTION
If you cannot open the charging door due to freezing weather, tap lightly or remove any ice near the charging door. Do not try to forcibly open the charging door.
-
Open the charging door and remove the AC charging inlet cover (1) to access the AC charging inlet port.
CAUTIONIn order to connect the charging connector, release the door lock to unlatch the charging connector lock system.
If not, the charging connector and the vehicle's charging inlet may be damaged.
-
Check if there is any dust, foreign substances, water or moisture on the charging connector and charging inlet.
-
Hold the charging connector handle and connect it to the vehicle AC charging inlet.
-
Push the connector until you hear a "clicking" sound. If the charging connector and charging terminal are not connected properly or damaged, this may cause a fire.
* For more information about how to charge and how to disconnect, please refer to the manual of each AC charger.
* The shape of the charging connector may be different for each manufacturer.
-
Connect the charging plug to the electric outlet at a AC charging station to start charging.
AC Charger -
Check if the charge indicator lamp In the instrument cluster is turned ON.

Charging does not occur when the charging indicator lamp is OFF.
When the charging connector and charging plug are not connected properly, reconnect the charging cable to charge.
 NOTICE
-
You can start charging when the EV button is in the OFF position and the gear is in P (Park). After charging has started, you can use electrical components, such as the radio by pressing the EV button to the ACC or ON position.
-
Do not shift other than P (Park) while charging. If the vehicle is shifted to other gear, charging stops immediately. If you want to start charging again, place the gear to P (Park) again or press the EV button to the OFF position. Unplug and reconnect the charging cable to start charging again.
-
During charging, you cannot move the gear from P (parking) to other positions.
-
-
After charging has started, estimated charging time, current SOC, and charge level in kW. is displayed, as well as the charge level, on the instrument cluster for about 1 minute.
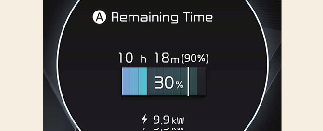
A: Remaining Time
* The remaining charging time in the LCD image may differ from actual charging time.
If you open the driver door while charging, the estimated charging time is also displayed on the instrument cluster for about 1 minute.
When scheduled charging is set, the estimated charging time is displayed as "--".
If air conditioning/remote air conditioning control is set, the estimated time to charge is displayed as "--".
In order to disconnect the charging connector, release the door lock to unlatch the charging connector lock, if the charge auto lock has not been activated.
If not, the charging connector and the vehicle's charging inlet may be damaged.
Depending on the condition and durability of the high voltage battery, charger specifications, and ambient temperature, the time required for charging the battery may vary.
Charging connector AUTO/LOCK mode
When the charging connector and the charging inlet are connected, you can choose the mode on the infotainment system. The charging connector will be locked at a different time depending on the selected mode.
For more information, refer to the More Details.
How to disconnect AC charger
-
When charging is complete, remove the charging plug from the electrical outlet.
AC Charger -
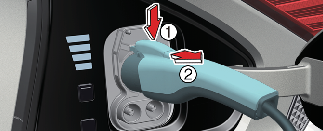
Hold the charging connector handle (2) and pull it while pressing the release button (1).
To prevent charging cable theft, the charging connector cannot be disconnected from the inlet when the vehicle's doors are locked. Unlock all doors to disconnect the charging connector from the inlet.
However, if the vehicle is in the charging connector AUTO mode, the charging connector automatically unlocks from the inlet when charging is completed.
For more details, refer to More Details.
CAUTIONIn order to disconnect the charging connector, release the door lock to unlatch the charging connector lock system.
If not, the charging connector and the vehicle's charging inlet may be damaged.
CAUTIONBefore disconnecting the charging connector, make sure the vehicle's doors are unlocked. When the doors are locked, the charging connector lock release button (1) will not work.
When disconnecting the charging connector, do not try to disconnect it by force without pressing the release button. This may damage the charging connector and vehicle charging inlet.
If the charging connector lock does not unlatch even after the door lock doors have been unlocked, open the liftgate and pull the emergency release lever to disconnect the charging connector. If this occurs, the charging connector lock function may have a problem, so have your vehicle inspected by an authorized Kia dealer.
-
Make sure to completely close the AC charging inlet cover.
-
Make sure to completely close the charging door.
-
Close the protective covers of the charging connector and the charging plug to prevent foreign substances from entering the terminals.
-
Store the charging cable safely in the storage compartment
How to store and keep the AC charging cable (if equipped)
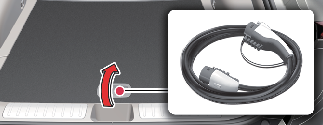
Store the charging cable safely in the storage compartment.
-
Do not disassemble or modify the charging Cable (ICCB: In-Cable Control Box). Such acts will void your warranty on the charger.
-
Always keep the charging connector and charging plug in clean and dry condition. Be sure to keep the charging cable in a condition where there is no water or moisture.
-
When the charging connector or charging plug is damaged, corroded, or rusted, or if it feels loose when the charging connector and charging plug are connected, do not charge the vehicle and contact an authorized Kia dealer.
-
Please note the following when using the charging cable.
-
Do not pull the cable by excessive force.
-
Do not twist or bend it.
-
Do not drag it on the floor.
-
Do not place any object on the cable.
-
Do not use an extension cord, when using the L1-Portable/120VAC charger.
-
Do not place an object that can generate high temperatures near the charger.
-
Do not drop or subject it to shock or impact.
-
Do not store it with liquids.
-
For cleaning the charging cable, use only a soft cloth like gauze and lightly wipe the surface with water containing a 3% neutral detergent and remove the water with a clean cloth.
Dry it in a well-ventilated shade after wiping off the water. Be careful not to expose the charging connector and charging plug to water.

Do not disassemble or modify the charging Cable (ICCB: In-Cable Control Box). Such acts could result fire, electric shock and injury.
When cleaning the charging cable, do not use an organic solvent, such as paint thinner, benzene, alcohol and gasoline. Doing so may change the color and damage the charging cable.
When you use a general car cleaner to clean the charging cable, make sure that any organic solvent mentioned above is not included.