Portable charge (sold separately)

-
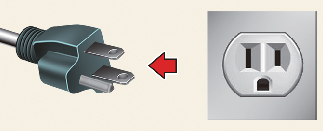
Cord & AC plug (Cord set)
-
Control Box
-
Charging Cable and Charging Connector
This cable is designed to prevent problems caused by unexpected battery discharge and when you use general outlets, it may lead to excessive electricity charges as the electricity charges for electric vehicles will not be applied. So refrain from using it to fully charge your car.
If this cable is connected to a household power source, it may exceed the capacity of the outlet (amperage), resulting in safety problems such as electrical shutdown and fire.

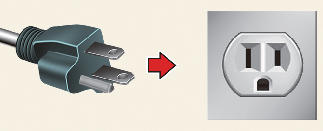
Household power source should be a dedicated 120VAC/15AMP/properly grounded outlet.
How to set the charge level of the portable charger (sold separately)
-
Check the outlet's current rating before connecting the plug to the outlet.
-
Connect the power plug to the household electrical outlet.
-
Check the status of the control box display
-
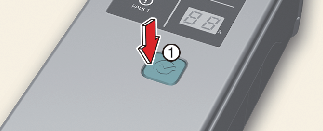
Adjust the charging current by pressing the button (1) on the back of the control box for more than 1 second.
-
Each time the button (1) is pressed, the control box display is sequentially changed to 12 A, 10 A and 8 A.
Once the charging current setting is complete, start charging (refer to More Details for more information).
Examples of ICCB charging current setting

|
Outlet Current |
ICCB Charge Level |
|---|---|
|
14-16A |
12A |
|
13-12A |
10A |
|
11-10A |
8A |
|
9-8A |
6A |

Please make sure that charge level selection matches the capacity of your circuit breaker to avoid blown fuse.
(Examples are only for reference and situations may vary depending on the surrounding environment.)
How to connect portable charger (ICCB: In-Cable Control Box) (sold separately)
-
Connect the plug to a household electric outlet.
NOTICE-
If the outlet is aged, damaged or cracked, do not use it.
-
Do NOT use an extension cord between the household electric outlet and L1-trickle charger, as household power source should be a dedicated 120VAC/15AMP/properly grounded outlet.
-
-
Check if the power lamp (green) on the control box turns ON.

-
While the brake pedal is pressed, engage the parking brake.
-
Place the gear in P (Park). If you try to charge while the gear is not placed in P (Park), it will automatically move to P (Park).
However, charge the battery only when the gear is placed in P for safety reasons.
* Make sure that the plug is not loosely put into the outlet. (If it is loose, it may generate heat.)
-
Press the charging door to open. You cannot open the charging door when the vehicle's doors are locked.
 CAUTION
If you cannot open the charging door due to freezing weather, tap lightly or remove any ice near the charging door. Do not try to forcibly open the charging door.
CAUTIONIn order to connect the charging connector, unlock the vehicle's doors to unlatch the charging connector lock system.
If not, the charging connector and the vehicle's charging inlet may be damaged.
-
Open the charging door and then open the inlet cover.
-
Open the protective cover of the charging connector and check if there is dust on the charging connector and charging inlet.
-
Hold the charging connector handle and connect it to the vehicle AC charging inlet.
-
Push the connector until you hear a "clicking" sound.
Charging starts automatically and the charging indicator lamp starts to blink.
 WARNING
If the charging connector and charging terminal are not connected properly, this may cause a fire.
-
Check if the charge indicator lamp (green) in the instrument cluster is turned ON.
Charging does not occur when the charging indicator lamp is OFF.

When the charging connector is not connected properly, reconnect the charging cable to charge it again.
NOTICE-
You can start charging when the EV button is in the OFF position and the gear is in P (Park).
After charging has started, you can use electrical components, such as the radio, by pressing the EV button to ACC or ON position.
-
You cannot move the gear other than P (Park) while charging. Charging stops immediately. If you want to start charging again, place the gear to P (Park) and press the EV button to the OFF position. Unplug and reconnect the charging cable to start charging again.
-
During charging, you cannot move the gear from P (parking) to other positions.
-
-
After charging has started, the estimated charging time is displayed on the instrument cluster for about 1 minute.
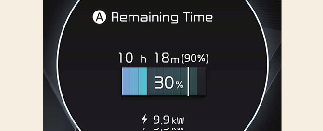
A: Remaining Time
* The remaining charging time in the LCD image may differ from actual charging time.
If you open the driver door while charging, the estimated charging time is also displayed on the instrument cluster for about 1 minute.
When scheduled charging is set, the estimated charging time is displayed as "--".
In order to disconnect the charging connector, release the door lock to unlatch the charging connector lock system.
If not, the charging connector and the vehicle's charging inlet may be damaged.
Depending on the condition and durability of the high voltage battery, charger specifications, and ambient temperature, the time required for charging the battery may vary.
Charging connector AUTO/LOCK mode
When the charging connector and the charging inlet are connected, you can choose the mode on the infotainment system. The charging connector will be locked at a different time depending on the selected mode.
For more information, refer to the More Details.
Charging status indicator lamp for portable charger
|
Indicator |
Details |
|
|---|---|---|
|
POWER |
On: Power on |
|
|
CHARGE |
On: Charge Blink: Current limit due to high plug temperature or high internal temperature |
|
|
FAULT |
Blink: Charging interrupted |
|
|
CHARGE LEVEL |
12 |
12 A |
|
10 |
10 A |
|
|
08 |
8 A |
|
|
06 |
6 A |
|
|
The charging current changes whenever the button (1) is pressed for less than 1 sec with the charger plugged into an electrical outlet but not the vehicle. Control box
|
||
|
Error Code |
Item |
Cause |
|---|---|---|
|
E1 |
Control Pilot communication |
Vehicle communication error |
|
E2 |
Leakage |
Current leakage |
|
E3 |
Charger error |
|
|
E4 |
Plug temperature |
Plug overtemperature warning |
|
E5 |
Plug temperature failure |
|
|
E6 |
Charger error |
|
|
E7 |
Overcurrent |
Charging overcurrent warning |
|
E8 |
Internal temperature |
Charger overheating |
|
E9 |
Charger error |
|
|
F1 |
Relay fusion |
Charger error |
|
F2 |
Ground Monitoring/Interrupt |
Poor grounding of outlet |
|
F3 |
Switched mode power supply power failure |
Switched mode power supply error (voltage failure) |
|
F4 |
Switched mode power supply error (abnormal voltage) |
|
|
F5 |
Control Pilot voltage error |
Control Pilot (-) voltage error |
|
F6 |
Control Pilot (+) voltage error |
|
|
F7 |
Temperature sensor error |
Plug temperature sensor error |
|
F8 |
PCB internal temperature sensor error |
Status/Diagnosis/Countermeasure
-
Charging connector plugged into vehicle (POWER Green ON)
-
Plug connected to an electric outlet (POWER Green ON)
While charging

-
Charge indicator (POWER Green ON/CHARGE Blue ON)
-
Charging current
Before plugging charging connector into vehicle (POWER Green ON, FAULT Red blink)

-
Abnormal temperature
-
ICCB (In-Cable Control Box) failure
-
Contact an authorized Kia dealer.
Plugged into vehicle (POWER Green ON, FAULT Red Blink)
-
Diagnostic device failure
-
Current leakage
-
Abnormal temperature
Leakage current failure (POWER Green ON, FAULT Red Blink)

-
After disconnecting and reconnecting the power plug, press and release the button for 2 seconds or longer to clear the error.
Power saving mode

-
Charge level indicator is turned off if there is no status change for more than 1 minute.
How to disconnect portable charging cable (ICCB: In-Cable Control Box) (sold separately)
-
Hold the charging connector handle (2) and pull it while pressing the release button (1).
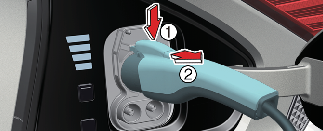
Before disconnecting the charging connector, make sure the vehicle's doors are unlocked. When the doors are locked, the charging connector lock system will be triggered. And the charging connector will not be disconnected.
However, in AUTO Mode, the lock is released automatically when charging is completed, and you can disconnect the charging connector.
For more information, refer to the More Details.
CAUTIONIn order to disconnect the charging connector, unlock the vehicle's doors to unlatch the charging connector lock system.
If not, the charging connector and the vehicle's charging inlet may be damaged.
CAUTIONWhen disconnecting the charging connector, do not try to disconnect it by force while not pressing the release button. This may damage the charging connector and vehicle charging inlet.
-
If the charging connector lock does not unlatch even after the vehicle's doors are unlocked, open the liftgate, and pull the emergency release lever to disconnect the charging connector. If such case occurs, the charging connector lock function may be defective, so have your vehicle inspected by an authorized Kia dealer.
-
-
Make sure to completely close the AC charging inlet cover.
-
Make sure to completely close the charging door.
-
Disconnect the plug from the household electric outlet. Do not pull the cable when disconnecting the plug.
-
Close the protective cover for the charging connector so that foreign substances do not flow into the terminal.
-
Put the charging cable inside the cable compartment to protect it.
Precautions for portable charging cable (ICCB: In-Cable Control Box) (sold separately)
-
Use a portable charging cable that is certified by Kia.
-
Do not try to repair, disassemble, or adjust the portable charging cable.
-
Do not use an extension cord or adapter.
-
Stop using immediately when failure occurs.
-
Do not touch the plug and charging connector with wet hands.
-
Do not touch the terminal part of the AC charging connector and the AC charging inlet on the vehicle.
-
Do not connect the charging connector to voltage that does not comply with specifications.
-
Do not use the portable charging cable if it is worn out, exposed, or there exists any type of damage on the portable charging cable.
-
If the ICCB case and AC charging connector is damaged, cracked, or the wires are exposed in any way, do not use the portable charging cable.
-
Do not let kids operate or touch the portable charging cable.
-
Charging with a worn out or damaged household electric outlet can result in a risk of electric shock. If you are unsure about the condition of a household electric outlet have it checked by licensed electrician and charge again.
-
Stop using the portable charging cable immediately if the household electric outlet or any components are overheating or you notice burning odors.
-
Keep the control box free of water.
-
Keep the AC charging connector or plug terminal free of foreign substances.
-
Do not step on the cable or cord.
-
Do not pull the cable or cord and do not twist or bend it. Do not charge when there is lightning.
-
Do not drop the control box or place a heavy object on the control box.
-
Do not place an object that can generate high temperatures near the charger when charging.