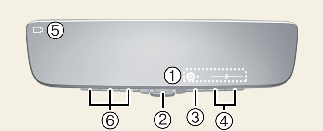
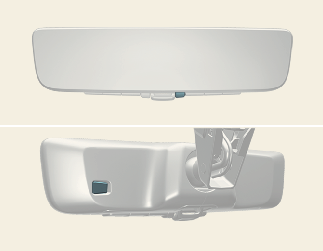
Inside rearview mirror
Do not place objects in the rear seat or cargo area which would interfere with your vision through the rear window.

Mirror adjustment
Do not adjust the rearview mirror while the vehicle is moving. This could result in loss of control.

Do not modify the inside mirror in any manner, including installing a wide mirror. Doing so could result in injury during an accident or deployment of the air bag.

Cleaning mirror
When cleaning the mirror, use a paper towel or similar material dampened with glass cleaner. Do not spray glass cleaner directly on the mirror. It may cause the liquid cleaner to enter the mirror housing.
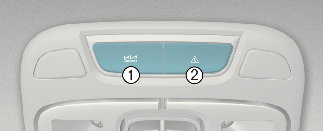
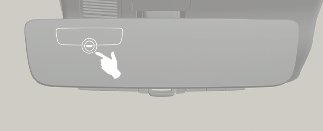
For Telematics button function
-
Kia Connect button
-
Roadside assist button
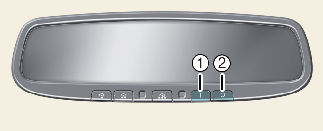
Day/night rearview mirror (if equipped)
* (1): Day, (2): Night
Pull the day/night lever toward you (2) to reduce the glare from the headlights of the vehicles behind you when driving at night.
Remember that you lose some rearview clarity in the night position.
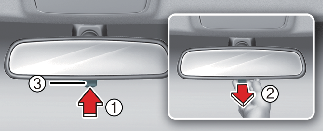
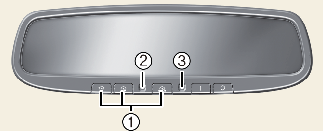
Electric Chromic Mirror (ECM) (if equipped)
The sensor (3) mounted in the mirror senses the light level around the vehicle, and automatically controls the headlight glare from the vehicles behind you.
When the engine is running, the glare is automatically controlled by the sensor mounted in the rearview mirror. Whenever the shift lever is shifted into reverse (R), the mirror will automatically go to the brightest setting in order to improve the drivers view behind the vehicle.
Cleaning mirror
When cleaning the mirror, use a paper towel or similar material dampened with glass cleaner. Do not spray glass cleaner directly on the mirror. It may cause the liquid cleaner to enter the mirror housing.
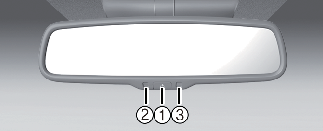
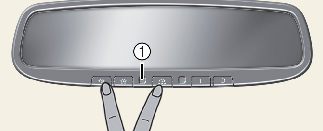
Operating the electric rearview mirror
-
Press the ON/OFF button (1) to turn the automatic dimming function off. The mirror indicator light will turn off.
-
Press the ON/OFF button (1) to turn the automatic dimming function on. The mirror indicator light (2) will illuminate.
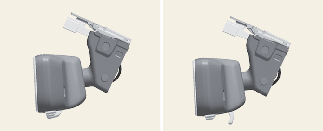
Digital Center Mirror (if equipped)
The Digital Center Mirror is a system that uses the camera on the rear of the vehicle and displays its image on the screen of the Digital Center Mirror. The Digital Center Mirror allows the driver to see the rear view despite obstructions, such as the headrest or luggage, ensuring rear visibility.
-
Failure to follow the warnings and instructions for proper use of the Digital Center Mirror could result in serious accident.
-
The Digital Center Mirror is a convenience feature but it is not a substitute for proper vehicle operation. The system has areas where objects cannot be viewed. Check the blind spot of the Digital Center Mirror before vehicle operation. The driver is always responsible for safe driving.
-
Do not operate the Digital Center Mirror while driving. Doing so can be a distraction and it could lose control of your vehicle and cause an accident or serious injury.
-
Do not disassemble or modify the Digital Center Mirror, the camera unit or wirings. If you do, it may result in accidents or fire. In case you notice smoke or smell coming from the Digital Center Mirror, stop using the system immediately. Have the system inspected by an authorized Kia dealer.
-
-
Be sure to adjust the Digital Center Mirror before driving.
-
Switch the system to the conventional rearview mirror mode and be properly seated on the driver's seat. Then adjust the mirror so as to see the rear window properly.
-
Push the lever all the way to change to digital mirror mode and adjust the display settings. Driving without adjusting the mirror may cause difficulty in watching the display at the Digital Mirror mode (camera view mode) due to the reflection from the surface of the mirror.
-
As the range of the image display by the Digital Center Mirror is different from that of the optical mirror, make sure to check.
-
-
If the Digital Center Mirror malfunctions, immediately switch the system to the conventional rearview mirror mode.
-
When strong light (for example, sunlight or high beams from following vehicles) enters the camera, a light beam or a glaring light may appear on the monitor screen of the Digital Center Mirror. In that case, switch the system to the conventional rearview mirror mode appropriately.
-
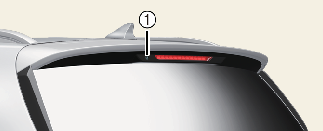
If the camera lens (1) is dirty, the displayed image may not be clear. In this case, clean it with a soft cloth dampened with water or a swab.
System component
-
Icon display area
Displays icons, adjusting Brightness & Tilt
-
Lever
Operate to change between digital mirror mode and optical mirror mode.
-
Menu button
Press to display the icon display area and select the item you want to adjust (Brightness & Tilt).
-
Select/adjust button
Press to change the setting of the item you want to adjust.
-
Camera indicator
Indicates that the camera is operating normally.
-
HomeLink buttons
For the operation of the “HomeLink® Universal Transceiver”.
How to change the mode
-
Pull the mode select lever all the way to the Digital Center Mirror mode (camera view mode).
* Displays an image of the area behind the vehicle. In this mode, camera indicator (6) is shown.
-
Push the mode select lever to all the way switch to the optical inside rearview mirror mode.
* Turns off the display of the Digital Center Mirror allows it to be used as an optical mirror.
Adjusting the mirror height
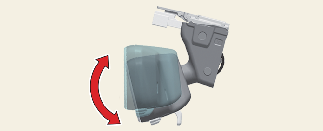
The height of the rearview mirror can be adjusted to suit your driving posture.
Change to optical mirror mode, adjusting the rearview mirror angle by moving it up and down.
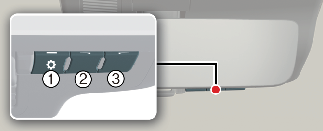
Display settings (Digital mirror mode)
-
Press the menu button (1) The icons will be displayed.
Icons
Settings

Select to adjust the brightness of the display.

Select to adjust the display up/down.
-
Press the menu button (1) repeatedly and select the item you want to adjust.
-
Press the button (2) or button (3) to change the setting.
The icons will disappear if the button is not operated for approximately 5 seconds or more.
* If the brightness of the Digital Center Mirror is set too high, it may cause eye strain.
Adjust the Digital Center Mirror to an appropriate brightness. If your eyes become tired, change to optical mirror mode.
To prevent the light sensors from malfunctioning, do not touch or cover them.
Digital mirror mode operating condition
The START/STOP button is in the ON position. When the START/STOP button is changed ignition switch LOCK/OFF or ACC position, the image will be disappeared.
When using the Digital Center Mirror in digital mirror mode
-
When the liftgate is open, the Digital Center Mirror image may not display properly. Before driving, make sure the liftgate is closed.
-
If the display is difficult to see due to reflected light, close the sunshade for the sunroof. (if equipped)
-
Any of the following conditions may occur when driving in the dark, such as at night. None of them indicates that the malfunction has occurred.
-
Colors of objects in the displayed image may differ from their actual color.
-
Depending on your physical condition or age, it may take longer than usual to focus on the displayed image. In this case, change to optical mirror mode.
-
Do not let passengers stare at the displayed image when the vehicle is being driven, as doing so may cause motion sickness.
-
When the system malfunctions
If the symbol shown in the illustration is displayed when using the Digital Center Mirror in digital mirror mode, the system may be malfunctioning. The symbol will disappear in a few seconds. Operate the lever, change to optical mirror mode and have the vehicle inspected by an authorized KIA dealer.
-
To prevent the Digital Center Mirror from malfunctioning.
-
Do not use detergents, such as thinner, benzene, and alcohol to clean the mirror. They may dis color, deteriorate or damage the mirror surface.
-
Do not remove, disassemble or modify the mirror and camera.
-
Do not allow an organic solvent, vehicle wax, window cleaner or glass coating to adhere to the camera. If this happens, wipe it off as soon as possible.
-
When cleaning the camera lens, wipe the camera lens with a damp soft cloth.
-
Do not strongly rub the camera lens, as it may be scratched and will not be able to transmit a clear image.
-
Do not subject the camera to a strong impact as this could cause a malfunction. If this happens, have the vehicle inspected by an authorized KIA dealer as soon as possible.
-
Operating the system at the ON position while the engine is not running would cause discharging of the battery.
-
Do not attach an antenna or wireless device near the Digital Center Mirror. Electric wave from a wireless device may cause disturbed image in Digital Center Mirror.
-
Do not push buttons excessively or operating the lever roughly may cause a system failure or the Digital Center Mirror itself to drop.
-
Never rotate the body of Digital Center Mirror by 90° or more. It may damage the Digital Center Mirror. Do not apply strong shocks to the body of Digital Center Mirror. It may cause a system failure.
-
If it is difficult to see the Digital Center Mirror display screen because of a strong external light, switch the mode to the conventional rearview mirror mode for better use.
Digital Center Mirror error icon and solution
|
Symptom |
Likely cause |
Solution |
|---|---|---|
|
If the high temp icon ( |
The Digital Center Mirror is extremely hot. (The display will gradually become more dim. If the temperature continues to increase, the Digital Center Mirror will turn off.) |
Reducing the cabin temperature is recommended to reduce the temperature of the mirror. (The icon will disappear when the mirror becomes cool.) If the icon does not disappear even though the mirror is cool, have the vehicle inspected by an authorized KIA dealer. |
|
If the display icon |
The system may be malfunctioning. |
Change to optical mirror mode and have the vehicle inspected by an authorized KIA dealer. |
 ) is displayed on the display right side.
 has been switched to
  which is the display error icon.
Electric chromic mirror with HomeLink system (if equipped)
Operating the electric rearview mirror
-
Press the I button (1) to turn the automatic- dimming function on. The mirror indicator light will illuminate.
-
Press the O button (2) to turn the automatic- dimming function off. The mirror indicator light will turn off.
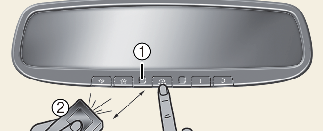
HomeLink® Wireless Control system
-
Homelink buttons
-
Indicator light
-
Glare detection sensor
Your new mirror comes with an integrated HomeLink Universal Transceiver, which allows you to program the mirror to activate your garage door(s), estate gate, home lighting, etc. The mirror actually learns the codes from your various existing transmitters.
Retain the original transmitter for future programming procedures (i.e., new vehicle purchase). It is also suggested that upon the sale of the vehicle, the programmed HomeLink buttons be erased for security purposes (follow step More Details in More Details).
Programming HomeLink
Follow these steps to train your HomeLink mirror:
-
When programming the buttons for the first time, press and hold the left and center buttons (
 ,
,  ) simultaneously until the indicator light begins to flash after approximately 20 seconds. (This procedure erases the factory-set
default codes. Do not perform this step when programming the additional HomeLink buttons.)
) simultaneously until the indicator light begins to flash after approximately 20 seconds. (This procedure erases the factory-set
default codes. Do not perform this step when programming the additional HomeLink buttons.)
-
Flashing
NOTICEFor non-rolling code garage door openers, follow steps More Details- More Details.
For rolling code garage door openers, follow steps More Details- More Details.
For Canadian Programming, please follow the Canadian Programming section. For help with determining whether your garage door opener is non-rolling code or rolling code, please refer to the garage door openers owner's manual or contact HomeLink customer service at 1- 800-355-3515.
-
-
Press and hold the button on the HomeLink system you wish to train and the button on the transmitter while the transmitter is approximately 1~3 inches (2~8 cm) away from the mirror. Do not release the buttons until step 3 has been completed.
-
Flashing
-
Transmitter
-
-
The HomeLink indicator light will flash, first slowly and then rapidly. When the indicator light flashes rapidly, both buttons may be released. (The rapid flashing light indicates successful programming of the new frequency signal.)
Some gate and garage door openers may require you to replace step More Details with the "cycling" procedure noted in the "Canadian Programming" section of this document.
Programming rolling code
To train a garage door opener (or other rolling code equipped devices) with the rolling code feature, follow these instructions after completing More Details. (A second person assisting may make the following training procedures quicker & easier.)
-
Locate the "learn" or "smart" button on the device's motor head unit. Exact location and color of the button may vary by product brand. If there is difficulty locating the "learn" or "smart" button, reference the device's owner's manual or contact HomeLink at 1-800- 355-3515 or on the internet at www.homelink.com.
-
Press and release the "learn" or "smart" button on the device's motor head unit. You have 30 seconds to complete step More Details.
-
Return to the vehicle and firmly press and release the programmed HomeLink button up to three times. The rolling code equipped device should now recognize the HomeLink signal and activate when the HomeLink button is pressed. The remaining two buttons may now be programmed if they have not already been programmed. Refer to More Details.
Operating HomeLink
To operate, simply press the programmed HomeLink button.
Activation will now occur for the trained product (garage door, security system, entry door lock, estate gate, or home or office lighting). For convenience, the hand-held transmitter of the device may also be used at any time. The HomeLink Wireless Controls system (once programmed) or the original hand-held transmitter may be used to activate the device (e.g., garage door, entry door lock, etc.). In the event that there are still programming difficulties, contact HomeLink at 1-800-355-3515 or on the internet at www.homelink.com.
Erasing programmed HomeLink buttons
To erase the three programmed buttons (individual buttons cannot be erased):
-
Press and hold the left and center buttons simultaneously, until the indicator light begins to flash (approximately 20 seconds). Release both buttons. Do not hold for longer than 30 seconds.
HomeLink is now in the train (or learning) mode and can be programmed at any time.
Reprogramming a single HomeLink button
To program a device to HomeLink using a HomeLink button that has already been trained, follow these steps:
-
Press and hold the desired HomeLink button. Do NOT release until step 4 has been completed.
-
When the indicator light begins to flash slowly (after 20 seconds), position the hand-held transmitter 1~3 inches (2~8 cm) away from the HomeLink surface.
-
Press and hold the hand-held transmitter button (or press and "cycle" - as described in "Canadian Programming").
-
The HomeLink indicator light will flash, first slowly and then rapidly. When the indicator light begins to flash rapidly, release both buttons.
The previous device has now been erased and the new device can be activated by pushing the HomeLink button that has just been programmed. This procedure will not affect any other programmed HomeLink buttons.
Canadian Programming Garage & gate openers
During programming, your hand-held transmitter may automatically stop transmitting. Continue to press and hold the HomeLink button (note steps More Details through More Details in More Details) while you press and re-press ("cycle") your handheld transmitter every two seconds until the frequency signal has been learned. Upon successful training, the indicator light will flash slowly and then rapidly after several seconds.
Accessories
If you would like additional information on the HomeLink Wireless Control system, HomeLink compatible products, or to purchase other accessories such as the HomeLink® Lighting Package, please contact HomeLink at 1-800-355-3515 or on the internet at www.homelink.com.
FCC ID: NZLZTVHL3
IC: 4112A-ZTVHL3
This device complies with Part 15 of the FCC rules.
-
This device may not cause harmful interference, and
-
This device must accept any interference received, including interference that may cause undesired operation.
The transceiver has been tested and complies with FCC and Industry Canada rules. Changes or modifications not expressly approved by the party responsible for compliance could void the user's authority to operate the device.