Front seat adjustment for power seat
Before driving, adjust the seat to the proper position so you can easily control the steering wheel, pedals and switches on the instrument panel.

Unattended children
Never leave children unattended in a vehicle. Children might operate features of the vehicle that could injure them.

Power seating adjustments
-
The power seating controls function by electronic motor. Excessive operation may cause damage to the electrical equipment.
-
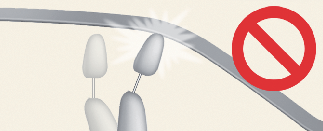
Do not operate two or more power seat control switches at the same time. Doing so may damage the power seat motor or electrical components.
Moving forward and backward

To move the seat forward or backward:
Reclining seatback

To recline the seatback:
Changing seat cushion tilt and height (if equipped)
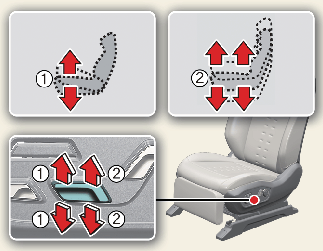
To change the height of the seat:
-
Pull the front portion (1) of the control switch up to raise or press down to lower the front part of the seat cushion.
-
Pull the rear portion (2) of the control switch up to raise or press down to lower the back part of the seat cushion.
-
Release the switch once the seat reaches the desired position.

For the relaxation comfort seats, the seat and backrest move together when adjusting the relaxation tilt.
Adjusting lumbar support for driver's seat (if equipped)

The lumbar support can be adjusted by pressing the lumbar support switch on the side of the seat.
Leg support (if equipped)

To use the leg support:
-
Push the control switch forward or backward to move the leg support to the desired angle.
-
Release the switch once the seat reaches the desired position.
-
When you adjust the leg support of a seat, it's possible for your feet to get stuck under or on nearby objects located in the space between the front seat and the instrument panel. It's important to be cautious and mindful during this process, as unexpected injuries could occur.
-
It's important to exercise caution when using the switch around children, as there is a risk of unexpected injuries.
Do not sit on the edge of the leg support or place heavy objects on it. It can cause the leg support to malfunction.
Move the seat back before using the leg support. If the seat is too close to surrounding parts, it may restrict the use of the leg support.
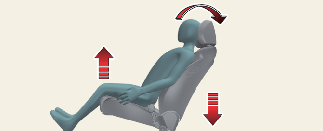
Relaxion comfort seat (Driver's seat) (if equipped)
Relaxion comfort seats distribute body pressure and concentrated weight on specific body parts that occur while sitting in the same position for a long period of time. The seat relieves fatigue and discomfort by providing the optimal sit position.
-
Do not use the relaxion comfort seat while the vehicle is moving. Using the relaxion comfort seat could distract the driver and increase the risk of injuries in the event of a collision or sudden stop.
-
Be careful not to get your body or objects caught while the relaxion comfort seat is operating.
-
As the risk of injury may increase in the event of a collision with the relaxation comfort seat is being operated, use it only when parked/stopped or while resting.
-
If you operate the relaxation comfort seat while wearing the seat belt, the seat belt on the chest side may not adhere to your chest firmly, so use it only when parked/stopped or while resting.
-
Do not use the relaxion comfort seat while the vehicle is moving. The shoulder belt may not adhere to your chest firmly.
-
Do not use the relaxion comfort seat when the luggage or other objects are placed at the rear seat.
-
Do not use the relaxion comfort seat when the rear seats are not in the rearmost position and upright.
-
Check the occupants or other cargo in the luggage area before operating the relaxion comfort seat. Operate after securing sufficient clearance from the instrument panel or rear seatback.
Operating relaxion comfort seat
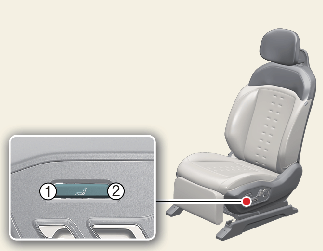
Operation
-
Press the rear portion of the relaxion comfort seat switch (2) for more than approximately 1 second to move to the relaxation comfort seat position.
-
If the relaxion comfort seat is operating, press the following buttons to stop the operation.
-
Seat adjustment switch (reclining, cushion height)
-
Relaxion comfort seat switch
-
-
After operating the relaxation comfort seat, you can adjust it for a more comfortable posture using the seat adjustment switch.
Non-operating condition(s)
-
When the vehicle is in R (Reverse)/N (Neutral)/D (Drive) position
-
When the vehicle speed is above 3 km/h (2 mph)
-
When the driver position memory system needs initialization
Returning relaxion comfort seat
Operation
-
While the seat is in the relaxion comfort seat position, press the front portion of the relaxion comfort seat switch (1) for more than approximately 1 second.
The seat cushion and seatback are returned to their original positions in the reverse order of the relaxion seat operation.
-
Driver's seat: Seat position when the last shift position is in P (Park)
-
Do not operate both switches at the same time. It may damage the relaxion comfort seat system.
Non-operating condition(s)
-
When the vehicle is in R (Reverse)/N (Neutral)/D (Drive) position
-
When the vehicle speed is above 3 km/h (2 mph)
-
When the driver position memory system needs initialization
Resetting relaxion comfort seat
Driver's side

-
Open the driver's side door when the vehicle is stopped and the vehicle in ON position.
-
Move the seat forward as far as possible, and raise the seatback angle as forward as possible by using the driver's seat forward/backward adjustment switch and seatback angle adjustment switch.
-
Press the Driver 1 switch (1) from the driver position memory system and push the front portion of the driver's seat forward/backward adjustment switch (the direction to move the seat position forward) at the same time for approximately 2 seconds.
Make sure there are no obstacles around the driver's seat before initialization.
The initialization process are as follows.
-
With a beep sound, the initialization process begins.
-
The seat and backrest automatically move to the rear. A beep sounds continuously during operation.
-
The seat and backrest will move to the center again and the initialization process will end with the last beep sound.
Non-operating condition(s)
The initialization process will be interrupted in the following situations.
-
When any problem occurs in the driver position memory system
-
When the driver position memory system button is pressed
-
When the driver's side seat adjustment switch is pressed
-
When the vehicle speed is above 3 km/h (2 mph)
-
When the driver's side door is closed
-
If the driver's seat operation and a beep sound stop during initialization, start initialization again.
-
After initialization, adjust the seat to suit the driver and save it to the driving position memory system again.
Cushion support (Driver's seat) (if equipped)
The cushion support adjustment function allows the driver to adjust the position of the cushion to increase comfort while driving. It is a feature that is designed to provide better support and reduce fatigue during long drives.

-
Push the cushion support adjustment switch upward(1) to raise the cushion support.
-
Push the cushion support adjustment switch downward(2) to lower the cushion support.
-
To adjust the cushion support height to the maximum, operate the cushion support adjustment switch for approximately 8 seconds. After reaching the maximum height, the height will not change even if you continue to operate the cushion support adjustment switch. Simply take your hand off the cushion support adjustment switch at this point.
Seat bolster (Driver's seat) (if equipped)
The seat bolster provides firm support to the driver's side while driving, which helps prevent the upper body from leaning to the side during turns. This improves stability and control while driving, especially during sporty or aggressive driving.

-
Turn the seat bolster adjustment switch clockwise and the seatback bolster will be tightened.
-
Turn the seat bolster adjustment switch counterclockwise and the seatback bolster will be loosened.
-
To adjust the seat bolster adjustment switch height to the maximum, turn the seat bolster adjustment switch clockwise for approximately 8 seconds. After reaching the maximum position, the seat bolster position will not change even if you continue to operate the seat bolster adjustment switch. Simply take your hand off the switch at this point.
Smart support (Driver's seat) (if equipped)
When driving in SPORT mode, the driver's seat bolster tightens to provide additional support to the driver's waist, which helps improve stability during sporty driving.
Operation
-
Select Setup → Vehicle → Seats → Smart posture care from the infotainment system.
Operating condition(s)
-
When SPORT mode is selected in the Drive Mode
-
The seat bolster is tightened
-
The cushion support position returns to the vehicle's initial setting position.
-
-
The seat bolster is tightened further when the vehicle's speed is approximately 130 km/h (80 mph) or higher.
-
If both conditions below are satisfied, the seat bolster and cushion support position returns to the previous state.
-
When the Drive Mode other than SPORT mode is selected
-
When the vehicle's speed is below approximately 110 km/h (70 mph).
-
Ergo-motion seat (Driver's seat) (if equipped)
Ergo-motion seat uses air pockets to provide adjustable cushioning and support to the driver, helping to reduce fatigue and improve comfort during long drives or in varying driving conditions.
Setting the Ergo-Motion Seat

-
Ergo-Motion Seat
-
Comfortable Stretch
-
Smart Posture Assist
-
Use Lumbar Stabilization System while Driving
Select Setup → Vehicle → Seat → Ergo-Motion Seat from the infotainment system.
Ergo-motion seat modes
Comfort stretching
The seat can be moved to relieve the driver's pelvis and back fatigue.

Operation
-
Each time the comfort stretch control switch located on the driver's door is pressed, the mode changes in the following order and is displayed on the infotainment system screen.
-
Pelvic: The cushion part moves to help the pelvis move left and right.
-
Lumbar: The lumbar support moves and helps exercise the back and front of the waist.
-
Whole Body: The cushion and lumbar support move sequentially to help the whole body exercise to relieve fatigue.
-
Off: Disable the comfort stretching function.
-
-
Comfort Stretching can be turned off by pressing the switch for approximately 1 second or longer during comfort stretching operation.
-
During the operation of the Comfort Stretching function, press any of the seat adjustment switches (cushion support, lumbar support, bolster adjustment device), so the operation stops.
-
Select Setup → Vehicle → Seat → Ergo-Motion Seat → Comfortable Stretch from the infotainment system to change the intensity and duration of the comfort stretching feature.
-
Intensity: Normal/Strong
-
Duration: Short (10 min.), Normal (15 min.), Long (20 min.)
-
Posture assist
After about an hour of driving with the driver's seat belt fastened, the posture assist function automatically turns on and assists the driver's posture by adjusting the driver's seat's hips and waist parts.
-
Select Setup → Vehicle → Seat → Ergo-Motion Seat → Smart Posture Assist from the infotainment system.
-
If you press the seat adjustment switch (cushion support, lumbar support, bolster adjustment device) while the posture assist function is operating, the operation stops.
If both conditions below are satisfied, the posture assist function automatically operates to assist the driver's posture.
-
The vehicle is in ON position
-
The driver's side seatbelt is fastened
Lumbar Stabilization System while driving
This function repeats the adjustment of the lumbar support in a regular pattern to reduce back fatigue when driving continuously for a long time.
-
Select Setup → Vehicle → Seat → Ergo-Motion Seat → Use Lumbar Stabilization System while Driving (Off, 30 min, 1hour) from the infotainment system.
-
If you press the lumbar support adjustment switch while the lumber support function is operating while driving, the operation stops.
Activates automatically after 30 minutes or 1 hour of continuous driving.
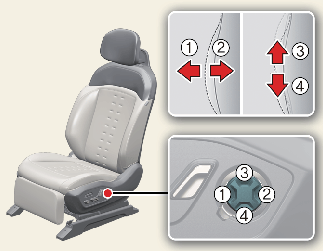
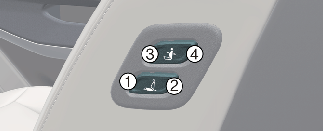
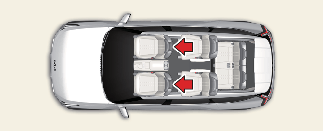
Walk-in seat (Passenger's seat) (if equipped)
The rear seat passenger may use the switches to control the front passenger seat.
Sliding forward or rearward:
-
To move the front passenger seat forward, press the switch (1). To move the front passenger seat rearward, press the switch (2).
Angle adjustment:
-
To recline the front passenger seatback forward, press the switch (3). To recline the front passenger seatback rearward, press the switch (4).
Seatback pocket (if equipped)
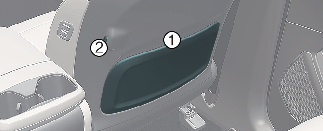
Seatback pockets
Do not put heavy or sharp objects in the seatback pockets. In an accident they could come loose from the pocket and injure vehicle occupants.
Headrest for front seat
The headrest not only provides comfort for the driver and front passenger, but also helps protect the head and neck in the event of a rear collision.
For maximum effectiveness in case of an accident, the headrest should be adjusted so the middle of the headrest is as high as the center of gravity of an occupant's head. Generally, the center of gravity of most people's heads is the top of their eyes.
Adjust the headrest as close to your head as possible. The use of a cushion that holds the body away from the seatback is not recommended.
Headrest removal/adjustment
-
Do not operate the vehicle with the headrests removed. Headrests can provide critical neck and head support in a crash.
-
Do not adjust the headrest height while the vehicle is in motion. The driver may lose control of the vehicle.
Excessive pulling or pushing may damage the headrest.
Adjusting the height up and down
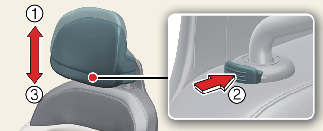
To raise the headrest:
-
Pull it up to the desired position (1).
-
To lower the headrest, push and hold the release button (2) on the headrest support.
-
Lower the headrest to the desired position (3).
If you move the seatback forward with the headrest and seat cushion raised, the headrest may contact the sun visor or other parts of the vehicle.
Removing headrest

To remove the headrest:
Removing headrest
NEVER allow anyone to ride in a seat with the headrest removed or reversed. Headrests can provide critical neck and head support in an accident.
Reinstalling headrest

To reinstall the headrest:
Headrest Reinstallation
To reduce the risk of injury to the head or neck, always make sure the headrest is locked into position and adjusted properly after reinstalling.