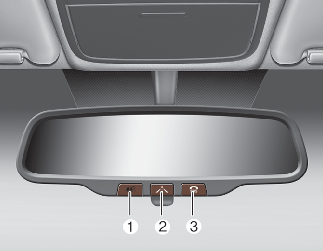
Inside rearview mirror
Do not place objects in the rear seat or cargo area which would interfere with your vision through the rear window.

Mirror adjustment
Do not adjust the rearview mirror while the vehicle is moving. This could result in loss of control.
Do not modify the inside mirror and don't install a wide mirror. It could result in injury during an accident or deployment of the air bag.

Cleaning mirror
When cleaning the mirror, use a paper towel or similar material dampened with glass cleaner. Do not spray glass cleaner directly on the mirror. It may cause the liquid cleaner to enter the mirror housing.
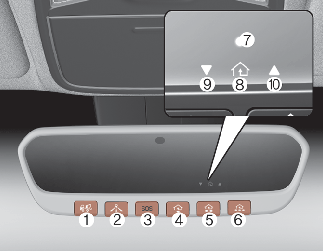
Day/night rearview mirror with Telematics function (if equipped)

* (1): Day, (2): Night
Make this adjustment before you start driving and while the day/night lever (1) is in the day position.
Pull the day/night lever (2) toward you to reduce the glare from the headlights of the vehicles behind you during night driving.
Remember that you lose some rearview clarity in the night position.
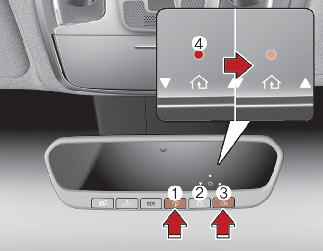
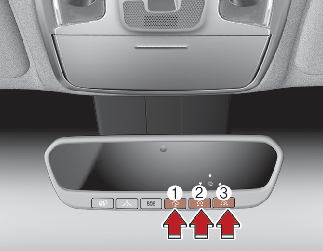
Telematics buttons are also located on the mirror.
-
Roadside Assist button
-
Virtual Assist button
-
SOS button
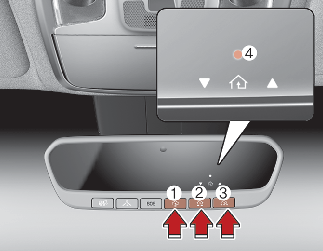
Electric chromic mirror (ECM) with HomeLink® system
Your vehicle may be equipped with a Gentex Automatic-Dimming Mirror with an Integrated HomeLink® Wireless Control System.
During nighttime driving, this feature will automatically detect and reduce rearview mirror glare. The HomeLink® Universal Transceiver allows you to activate your garage door(s), electric gate, home lighting, etc.
-
Roadside Assist button
-
Virtual Assist button
-
SOS button
-
HomeLink Channel 1
-
HomeLink Channel 2
-
HomeLink Channel 3
-
User interface indicator
-
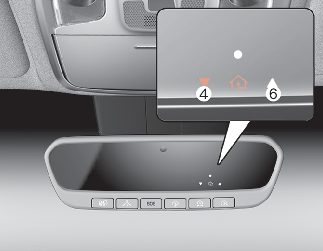
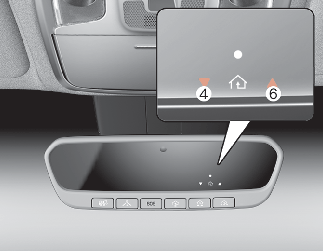
HomeLink operation indicator
-
Orange blinking: Closing
Solid Green: Closed
-
Orange blinking: Opening
Solid Green: Open
The NVS® Mirror in your vehicle is the most advanced way to reduce annoying glare in the rearview mirror during any driving situation. For more information regarding NVS® mirrors and other applications, please refer to the Gentex website: www.gentex.com
* Night Vision Safety™ is a registered trademark of Gentex Corporation.
The NVS® Mirror automatically reduces glare during driving conditions based upon light levels monitored in front of the vehicle and from the rear of the vehicle. These light sensors are visible through openings in the front and rear of the mirror case. Any object that obstructs either light sensor will degrade the automatic dimming control feature.
Automatic-dimming function

The mirror defaults to the ON position each time the vehicle is started.
Integrated HomeLink® Wireless Control System
The HomeLink® Wireless Control System provides a convenient way to replace up to three hand-held radio frequency (RF) transmitters with a single built-in device. This innovative feature will learn the radio frequency codes of most current transmitters to operate devices such as gate operators, garage door openers, entry door locks, security systems, even home lighting. Both standard and rolling code-equipped transmitters can be programmed by following the outlined procedures. Additional HomeLink® information can be found at: www.homelink.com or by calling 1-800-355-3515.
* HomeLink® is a registered trademark of Gentex Corporation.
Retain the original transmitter of the RF device you are programming for use in other vehicles as well as for future HomeLink® programming. It is also suggested that upon the sale of the vehicle, the programmed HomeLink® buttons be erased for security purposes.
Programming HomeLink®
-
When programming a garage door opener, it is advised to park the vehicle outside of the garage.
-
It is recommended that a new battery be placed in the hand-held transmitter of the device being programmed to HomeLink® for quicker training and accurate transaxle of the radio-frequency signal.
-
Some vehicles may require the POWER button to be ACC (or "Accessories") position for programming and/or operation of HomeLink®.
-
In the event that there are still programming difficulties or questions after following the programming steps listed below, contact HomeLink® at: www.homelink.com or 1-800-355-3515.
Standard programming
To train most devices, follow these instructions:
-
If the indicator (4) is turned ON in Orange, go to Step More Details since it is a new programming.
-
If the indicator (4) is continuously turned ON or flashes in Green rapidly several times, go to Step More Details since it is a programmed button.
-
Some garage door openers require pressing the programed button on the mirror up to three times right after the programing is just completed to operate the garage door.
-
The indicator (4) is turned ON in Orange and flashes for about 60seconds, during the programing mode and if a programing is not succeeded within the 60 seconds, the programing mode will be aborted.
HomeLink® should now activate your rolling code equipped device.
Gate operator & Canadian programming
The indicator light will flash slowly and then rapidly after several seconds upon successful training.
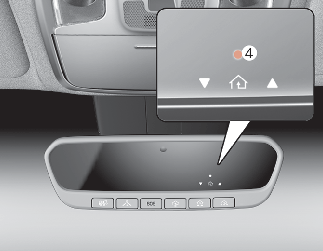
Operating HomeLink®
-
Press and release one of the HomeLink buttons (1, 2 or 3) that programed.
The HomeLink indicator (4) will operate as below:
-
Indicates Green and is continuously ON (Fixed Code Garage Door Opener)
-
Flashes in Green rapidly (Rolling Code Garage Door Opener)
-
Erasing HomeLink® buttons
The indicator (4) is turned continuously ON in orange for about 10 seconds.
Then the indicator (4) color changes to Green and flashes rapidly.
Now HomeLink button (1), (2) and (4) memories are all cleared.
NVS® is a registered trademark and Z-Nav™ is a trademark of the Gentex Corporation, Zeeland, Michigan. HomeLink® is a registered trademark owned by Johnson Controls, Incorporated, Milwaukee, Wisconsin.
FCC ID: NZLZTVHL3
IC: 4112A-ZTVHL3
This device complies with Industry Canada licence-exempt RSS standard(s).
Operation is subject to the following two conditions:
-
This device may not cause interference, and
-
This device must accept any interference, including interference that may cause undesired operation of the device.
Two Way Communication Programing
If the both indicator (4) and (6) are flashing rapidly for about 5 seconds, the two way synchronization is completed.
Some recent garage door opener provides automatic two way communication synchronization while just programing OT (Original Transmitter).
Operating Two Way Communication
-
Press and release (1), (2) or (3) button.
The indicator (4) and (6) operates as below:
-
If the indicator (4) flashes in Orange, it indicates that the garage door is "closing".
-
If the indicator (4) is ON continuously in Green, it indicates that the garage door is "closed".
-
If the indicator (6) flashes in Orange, it indicates that the garage door is "Opening".
-
If the indicator (6) is ON continuously in Green, it indicates that the garage door is "Opened".
-
If the indicator (4) or (6) does not turn to Green, it indicates that the last status of garage door was not received properly (HomeLink mirror tries to receive the last status of garage door for seconds.)
-
Recalling Garage Door Status
In order to recall the last known status of the last activated device, press the buttons "1 and 2" OR "2 and 3" simultaneously.
-
If the indicator (4) is ON continuously in Green, it indicates that the last activated device was "closed" properly.
-
If the indicator (6) is ON continuously in Green, it indicates that the last activated device was "open" properly.
Two way communication range distance between "vehicle" and "garage door opener" is 100 m (3,937 in).
The range may be reduced or increased a little due to obstacle conditions around the garage door opener, such as houses or trees.