Changing tires
Jacking instructions
The jack is provided for emergency tire changing only.
Follow jacking instructions to reduce the possibility of personal injury.

Changing tires
-
Never attempt vehicle repairs in the traffic lanes of a public road or highway.
-
Always move the vehicle completely off the road and onto the shoulder before trying to change a tire. The jack should be used on level firm ground. If you cannot find a firm, level place off the road, call a towing service company for assistance.
-
Be sure to use the correct front and rear jacking positions on the vehicle; never use the bumpers or any other part of the vehicle for jacking support.
-
The vehicle can easily roll off the jack causing serious injury or death.
-
Do not get under a vehicle that is supported by a jack.
-
Do not start or run the engine while the vehicle is on the jack.
-
Do not allow anyone to remain in the vehicle while it is on the jack.
-
Make sure any children present are in a secure place away from the road and from the vehicle to be raised with the jack.
Tire replacement
-
Park on a level surface and apply the parking brake firmly.
-
Shift the shift lever into R (Reverse) with manual transmission or P (Park) with automatic transmission.
-
Activate the hazard warning flasher.

-
Remove the wheel lug nut wrench, jack, jack handle, and spare tire from the vehicle.
-
Block both the front and rear of the wheel that is diagonally opposite the jack position.
 WARNING
Changing a tire
-
To prevent vehicle movement while changing a tire, always set the parking brake fully, and always block the wheel diagonally opposite the wheel being changed.
-
It is recommended that the wheels of the vehicle be chocked, and that no person should remain in a vehicle that is being jacked.
-
-
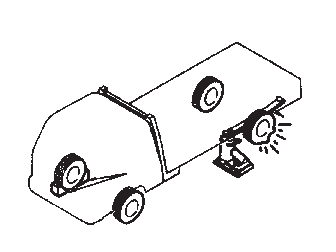
Insert the screwdriver into the grove of the wheel cover and pry gently to remove the wheel cover. (if equipped)
-
Loosen the wheel lug nuts counterclockwise one turn each, but do not remove any nut until the tire has been raised off the ground.
Front (1 Ton)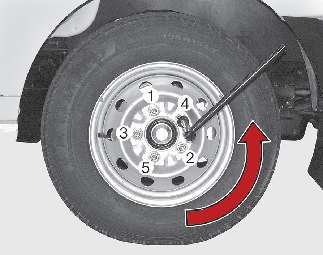 Front (1.4 Ton)
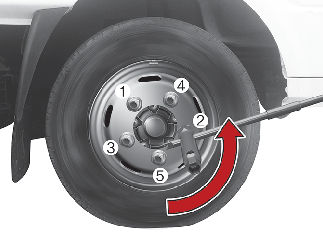 Rear (1.4 Ton)
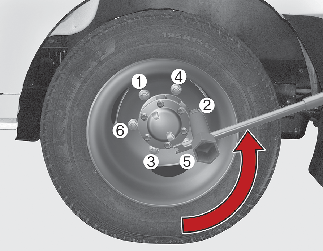
-
Place the jack at the front or rear jacking position closest to the tire you are changing. Place the jack as shown in the illustration.
Front (1 Ton) Front (1.4 Ton)
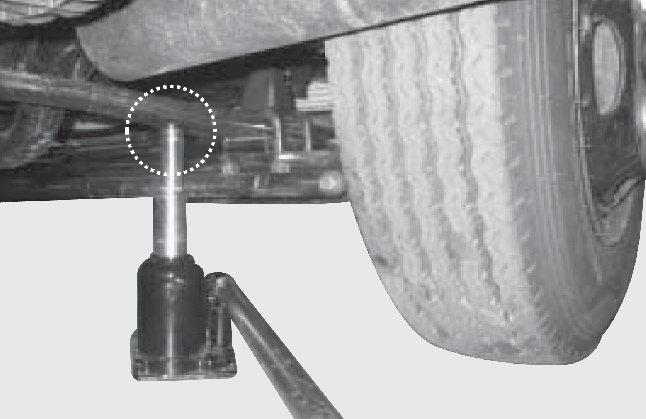
-
Securely tighten the valve of the jack with the groove on the jack.
-
Move the jack handle up and down until the top of the jack contacts the proper point and takes on a slight load, raising the vehicle until the tire just clears the ground. This measurement is approximately 30 mm (1.2 inches). Before removing the wheel lug nuts, make sure the vehicle is stable and that there is no chance for movement or slippage.
Rear (1 Ton)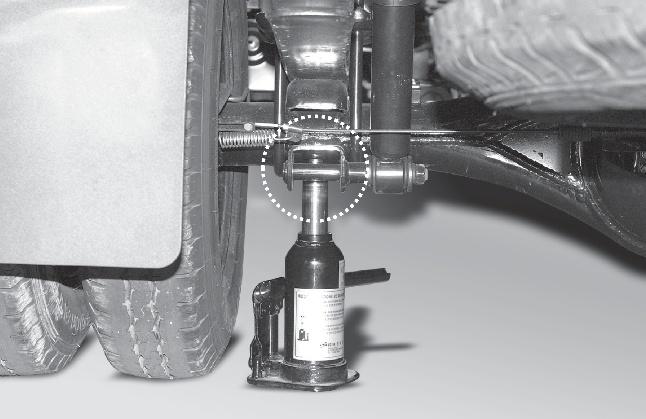 Rear (1 Ton)
 Rear (1.4 Ton)
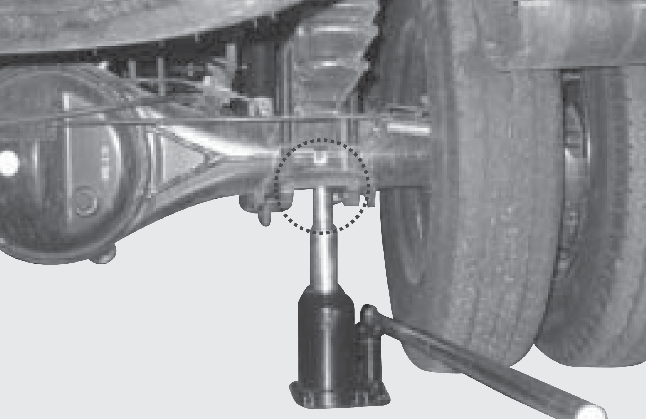
 WARNING
Jack location
To reduce the possibility of injury, be sure to use only the jack provided with the vehicle and in the correct jack position; never use any other part of the vehicle for jack support.
 CAUTION
This jack is hydraulic, and the ram is a two-stage type. When both rams are raised and the “stop mark (yellow line)” of the upper ram becomes visible, stop jacking immediately.
-
Remove the wheel lug nuts by turning them counterclockwise, then remove the wheel.
-
Mount the spare tire into position and install the wheel lug nuts with the beveled edge inward.
-
Gradually loosen the valve of the jack with the groove on the jack handle to lower the vehicle.
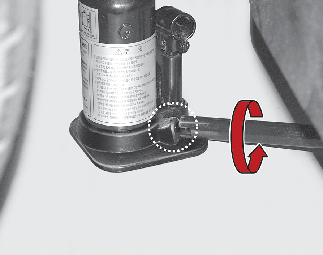
 NOTICE
If the valve is loosened by turning it 2 or more times in the counterclockwise direction, the jack’s oil will leak and the jack cannot be used.
-
Once the wheel lug nuts have been tightened, lower the vehicle fully to the ground and continue to tighten the lug nuts until they are fully secured. Tighten the wheel lug nuts firmly in a “
 ” pattern.
If you are unsure of the tightness of the wheel lug nuts, have them checked at the nearest service station. Improperly tightened wheel lug nuts could cause brake pedal vibration while braking.
Wheel nut tightening torque :
|
Engine |
Body type |
Front |
Rear |
Remark |
||||||
|---|---|---|---|---|---|---|---|---|---|---|
|
Fuel |
Displacement (Liter) |
Hub nut Tightening Torque |
Hub nut Tightening Torque |
|||||||
|
kgf.m |
lbf.ft |
N.m |
kgf.m |
lbf.ft |
N.m |
|||||
|
Diesel |
2.5 VGT |
Low deck |
Standard/King Cab. |
19~22 |
137~ 159 |
186~ 216 |
19~22 |
137~ 159 |
186~ 216 |
|
|
Double Cab. |
19~22 |
137~ 159 |
186~ 216 |
19~22 |
137~ 159 |
186~ 216 |
||||
|
High deck |
19~22 |
137~ 159 |
186~ 216 |
19~22 |
137~ 159 |
186~ 216 |
||||
|
2.7 VGT |
Low deck |
Standard/King Cab. |
9~12 |
65~87 |
88~ 118 |
19~22 |
137~ 159 |
186~ 216 |
||
|
Double Cab. |
9~12 |
65~87 |
88~ 118 |
19~22 |
137~ 159 |
186~ 216 |
||||
|
High deck |
19~22 |
137~ 159 |
186~ 216 |
19~22 |
137~ 159 |
186~ 216 |
||||
|
4WD |
Standard/King Cab. |
19~22 |
137~ 159 |
186~ 216 |
19~22 |
137~ 159 |
186~ 216 |
|||
|
Double Cab. |
19~22 |
137~ 159 |
186~ 216 |
19~22 |
137~ 159 |
186~ 216 |
||||
|
2.5 VGT/ 3.0 VGT |
2WD |
Standard/King Cab. |
45~50 |
325~ 362 |
441~ 490 |
19~22 |
137~ 159 |
186~ 216 |
||
|
45~50 |
325~ 362 |
441~ 490 |
19~22 |
137~ 159 |
186~ 216 |
Syria |
||||
|
45~50 |
325~ 362 |
441~ 490 |
19~22 |
137~ 159 |
186~ 216 |
GCC (Model: K4000G) |
||||
Your vehicle has metric threads on the wheel studs and nuts. Make certain during wheel removal that the same nuts removed are reinstalled - or, if replaced, that nuts with metric threads and the same chamfer configuration are used. Installation of a non-metric thread nut on a metric stud or vice-versa will not secure the wheel to the hub properly and will damage the stud so that it must be replaced.
Note that most lug nuts do not have metric threads. Be sure to use extreme care in checking for thread style before installing aftermarket lug nuts or wheels.
If in doubt, consult a professional workshop. Kia recommends to consult an authorized Kia dealer/service partner.
Wheel studs
If the studs are damaged, they may lose their ability to retain the wheel. This could lead to the loss of the wheel and a collision.
To prevent the jack, jack handle, wheel lug nut wrench and spare tire from rattling while the vehicle is in motion, store them properly.
Check the inflation pressures as soon as possible after installing the spare tire. Adjust it to the specified pressure, if necessary. Refer to More Details.